什么是JMH JMH:Java Microbenchmark Harness Java 微基准测试工具。
JMH is a Java harness for building, running, and analysing nano/micro/milli/macro benchmarks written in Java and other languages targetting the JVM.
JMH是Java测试工具,用于构建、运行和分析用Java和其他针对JVM的语言编写纳秒/微秒/毫秒级别的基准测试。
BenchMark :又叫做基准测试,主要用来测试一些方法的性能,可以根据不同的参数以不同的单位进行计算(例如可以使用吞吐量为单位,也可以使用平均时间作为单位,在 BenchmarkMode 里面进行调整)。Micro Benchmark :简单地说就是在 method 层面上的 benchmark,精度可以精确到微秒级。OPS , Opeartion Per Second: 每秒操作量,是衡量性能的重要指标,数值越大,性能越好。类似的有 TPS, QPSWarmup 预热:为什么需要预热?因为 JVM 的 JIT 机制的存在,如果某个函数被调用多次之后,JVM 会尝试将其编译成为机器码从而提高执行速度。程序实际运行中会收到 JVM 的自动优化,为了让 Benchmark 的结果更加接近真实情况就需要进行预热。Iteration :iteration 是 JMH 进行测试的最小单位,包含一组 invocations。Invocation : 一次 benchmark 方法调用。Operation :benchmark 方法中,被测量操作的执行。如果被测试的操作在 benchmark 方法中循环执行,可以使用@OperationsPerInvocation表明循环次数,使测试结果为单次 operation 的性能。
JMH能干什么 当你定位到热点方法,希望进一步优化方法性能的时候,就可以使用 JMH 对优化的结果进行量化的分析。
Demo 测试字符拼接性能对比。这里测试+、StringBuilder.append方法、String.format方法、StringBuffer.append方法和Message.format方法。
1
2
3
4
5
6
7
8
9
10
11
12
13
14
15
16
17
18
19
20
21
22
23
24
25
26
27
28
29
30
31
32
33
34
35
36
37
38
39
40
41
42
43
44
45
46
47
48
49
50
51
52
53
54
55
56
57
58
59
60
61
62
63
64
65
66
67
68
@BenchmarkMode({Mode.AverageTime, Mode.Throughput}) @Warmup(iterations = 5, time = 3) @Measurement(iterations = 10, time = 5, timeUnit = TimeUnit.SECONDS) @Threads(8) @Fork(1) @State(value = Scope.Benchmark) @OutputTimeUnit(TimeUnit.NANOSECONDS) public class JMHStringTest @Param(value = {"10", "50", "100"}) private int length; private static final String FORMAT = "format:%s" ; private static final String MESSAGE_FORMAT = "MessageFormat:{0}" ; @Benchmark public void testStringAdd (Blackhole blackhole) String a = "" ; for (int i = 0 ; i < length; i++) { a += i; } blackhole.consume(a); } @Benchmark public void testStringBuffer (Blackhole blackhole) StringBuffer sb = new StringBuffer("" ); for (int i = 0 ; i < length; i++) { sb.append(i); } String a = sb.toString(); blackhole.consume(a); } @Benchmark public void testStringBuilder (Blackhole blackhole) StringBuilder sb = new StringBuilder("" ); for (int i = 0 ; i < length; i++) { sb.append(i); } String a = sb.toString(); blackhole.consume(a); } @Benchmark public void testStringFormat (Blackhole blackhole) String a = "" ; for (int i = 0 ; i < length; i++) { a = String.format(FORMAT, i); } blackhole.consume(a); } @Benchmark public void testMessageFormat (Blackhole blackhole) String a = "" ; for (int i = 0 ; i < length; i++) { a = MessageFormat.format(MESSAGE_FORMAT, i); } blackhole.consume(a); } public static void main (String[] args) throws RunnerException Options options = new OptionsBuilder() .include(JMHStringTest.class.getSimpleName()) .result("result.json" ) .resultFormat(ResultFormatType.JSON).build(); new Runner(options).run(); }
结果 1 2 3 4 5 6 7 8 9 10 11 12 13 14 15 16 17 18 19 20 21 22 23 24 25 26 27 28 29 30 31 32 33 34 35 36 37 38 39 40 41 42 43 44 45 46 47 48 49 # Run complete. Total time: 00:33:15 REMEMBER: The numbers below are just data. To gain reusable insights, you need to follow up on why the numbers are the way they are. Use profilers (see -prof, -lprof), design factorial experiments, perform baseline and negative tests that provide experimental control, make sure the benchmarking environment is safe on JVM/OS/HW level, ask for reviews from the domain experts. Do not assume the numbers tell you what you want them to tell. NOTE: Current JVM experimentally supports Compiler Blackholes, and they are in use. Please exercise extra caution when trusting the results, look into the generated code to check the benchmark still works, and factor in a small probability of new VM bugs. Additionally, while comparisons between different JVMs are already problematic, the performance difference caused by different Blackhole modes can be very significant. Please make sure you use the consistent Blackhole mode for comparisons. Benchmark (length) Mode Cnt Score Error Units JMHStringTest.testMessageFormat 10 thrpt 10 ≈ 10⁻³ ops/ns JMHStringTest.testMessageFormat 50 thrpt 10 ≈ 10⁻⁴ ops/ns JMHStringTest.testMessageFormat 100 thrpt 10 ≈ 10⁻⁴ ops/ns JMHStringTest.testStringAdd 10 thrpt 10 0.022 ± 0.001 ops/ns JMHStringTest.testStringAdd 50 thrpt 10 0.002 ± 0.001 ops/ns JMHStringTest.testStringAdd 100 thrpt 10 0.001 ± 0.001 ops/ns JMHStringTest.testStringBuffer 10 thrpt 10 0.017 ± 0.003 ops/ns JMHStringTest.testStringBuffer 50 thrpt 10 0.004 ± 0.001 ops/ns JMHStringTest.testStringBuffer 100 thrpt 10 0.002 ± 0.001 ops/ns JMHStringTest.testStringBuilder 10 thrpt 10 0.053 ± 0.001 ops/ns JMHStringTest.testStringBuilder 50 thrpt 10 0.010 ± 0.001 ops/ns JMHStringTest.testStringBuilder 100 thrpt 10 0.006 ± 0.001 ops/ns JMHStringTest.testStringFormat 10 thrpt 10 0.003 ± 0.001 ops/ns JMHStringTest.testStringFormat 50 thrpt 10 0.001 ± 0.001 ops/ns JMHStringTest.testStringFormat 100 thrpt 10 ≈ 10⁻⁴ ops/ns JMHStringTest.testMessageFormat 10 avgt 10 25605.470 ± 414.910 ns/op JMHStringTest.testMessageFormat 50 avgt 10 122378.489 ± 1459.915 ns/op JMHStringTest.testMessageFormat 100 avgt 10 259940.712 ± 4224.630 ns/op JMHStringTest.testStringAdd 10 avgt 10 367.216 ± 7.807 ns/op JMHStringTest.testStringAdd 50 avgt 10 3093.350 ± 10.119 ns/op JMHStringTest.testStringAdd 100 avgt 10 9832.107 ± 87.894 ns/op JMHStringTest.testStringBuffer 10 avgt 10 393.543 ± 3.611 ns/op JMHStringTest.testStringBuffer 50 avgt 10 1630.390 ± 11.141 ns/op JMHStringTest.testStringBuffer 100 avgt 10 3370.690 ± 20.653 ns/op JMHStringTest.testStringBuilder 10 avgt 10 145.529 ± 2.653 ns/op JMHStringTest.testStringBuilder 50 avgt 10 705.879 ± 2.388 ns/op JMHStringTest.testStringBuilder 100 avgt 10 1270.933 ± 6.166 ns/op JMHStringTest.testStringFormat 10 avgt 10 2932.713 ± 20.669 ns/op JMHStringTest.testStringFormat 50 avgt 10 15461.592 ± 95.181 ns/op JMHStringTest.testStringFormat 100 avgt 10 31097.770 ± 512.496 ns/op Benchmark result is saved to result.json Process finished with exit code 0
使用图片生成工具 我们刚刚在代码写了 .result("result.json") 在工程目录会生成一个result.json文件。这个可以上传到分析的网站
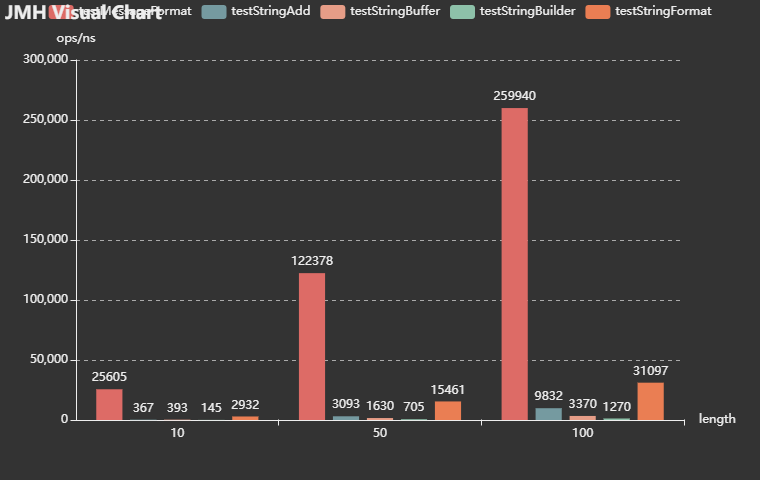
JMH Visual Chart的图片
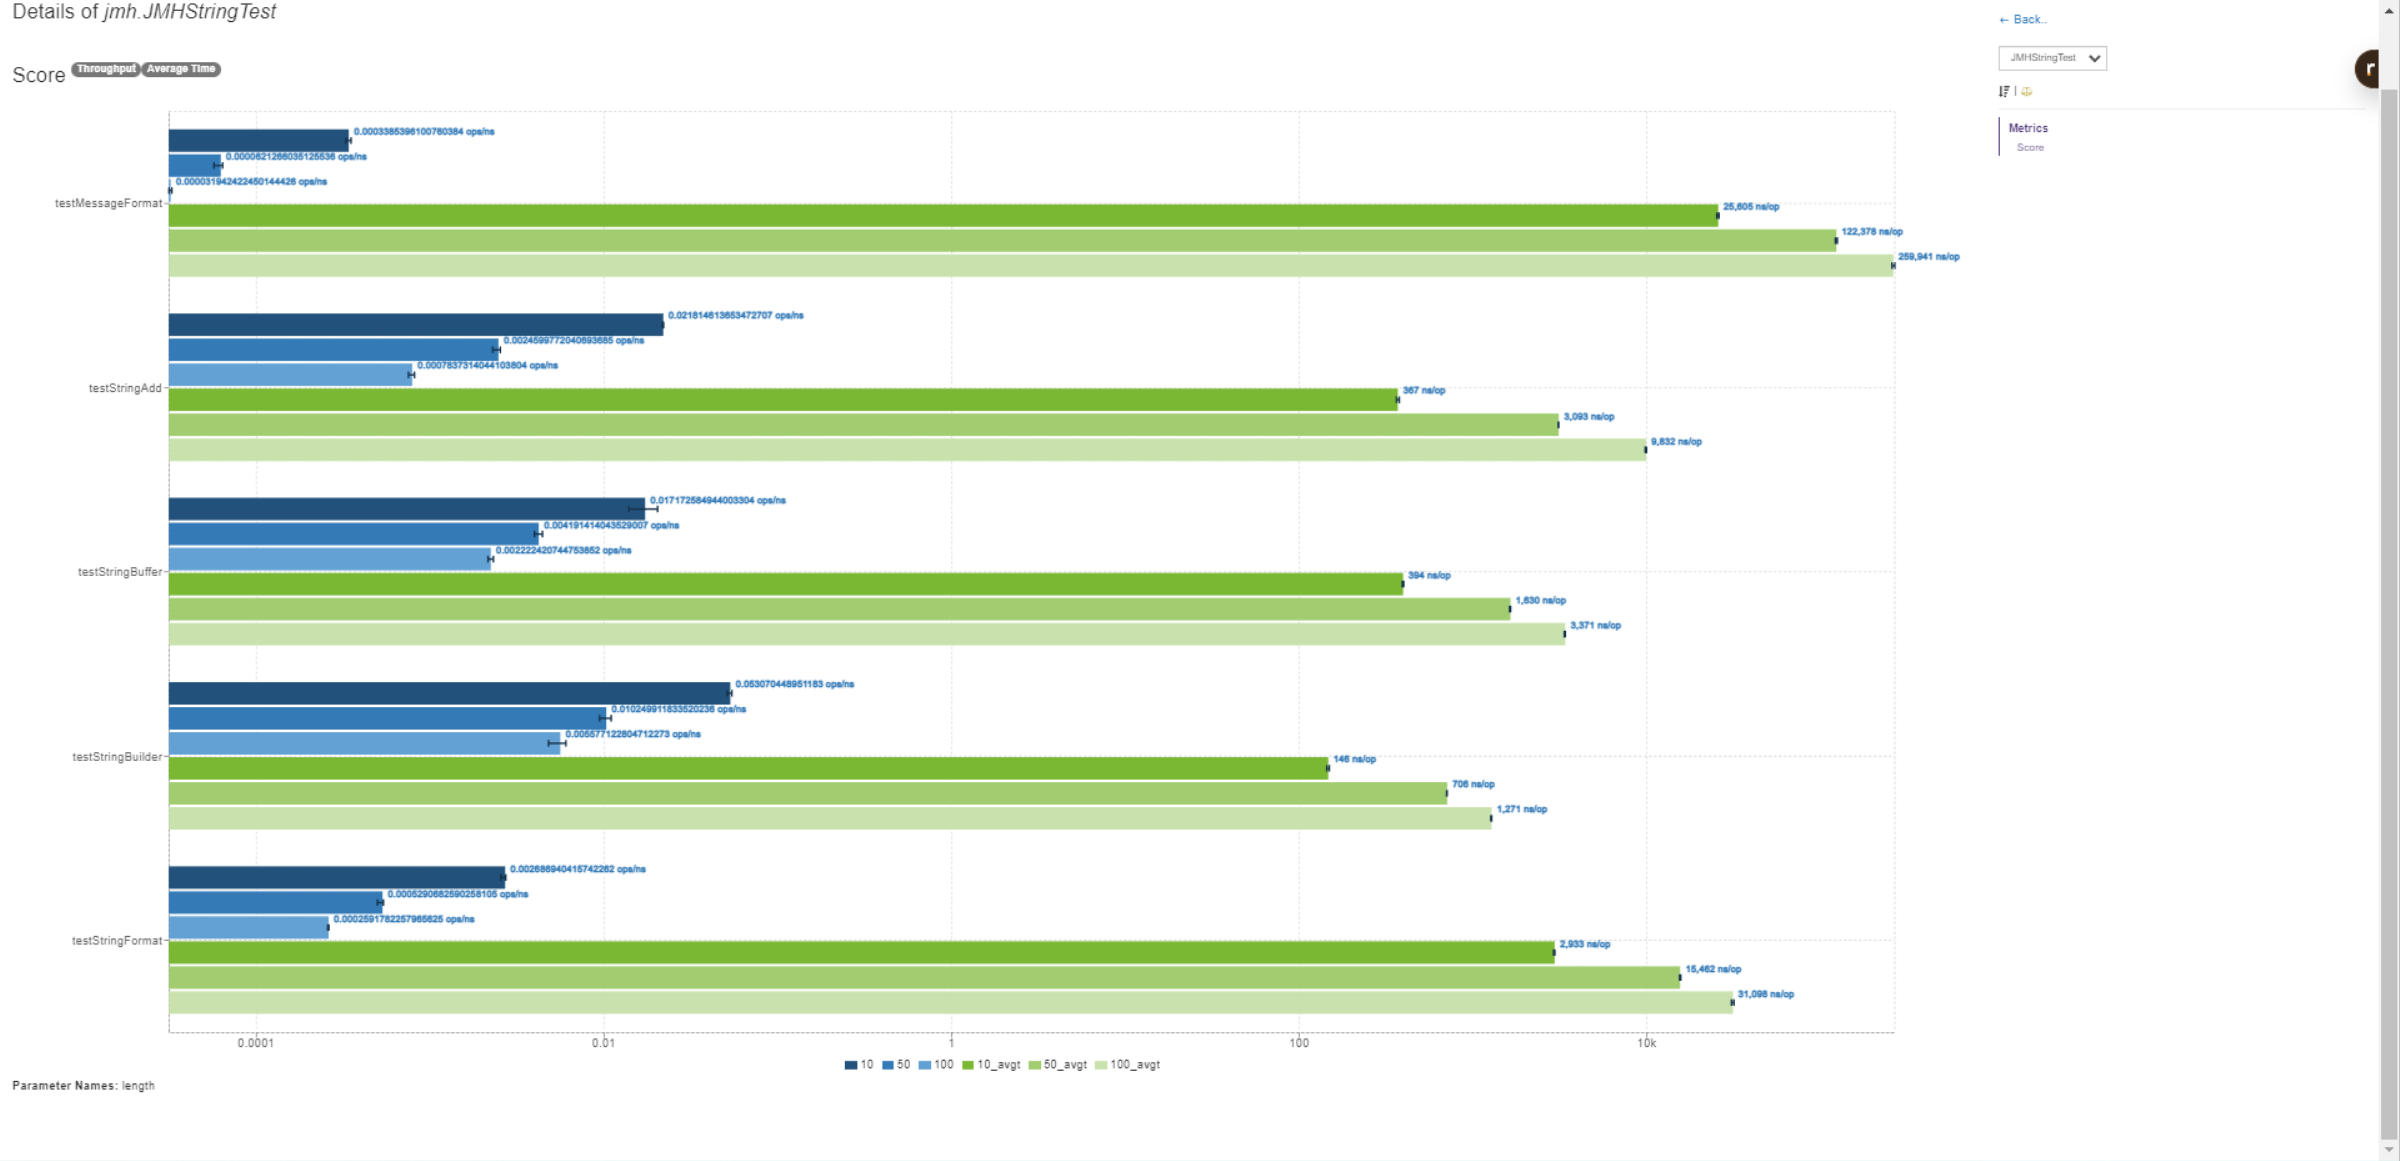
JMH Visualizer的图片
分析数据 通过图表展示更直观,因为这次测试有吞吐量和平均时间两种测试。对于吞吐量来说越大越好,对于平均时间来说越小越好。
通过吞吐量数据看StringBuilder.append方法表现最好;其次是+方法;StringBuffer.append方法居中;String.format方法和Message.format方法表现最差。
通过平均时间数据来看StringBuilder.append方法时间最短。StringBuffer.append方法和+方法差不多,Message.format方法表现最差,倒数第二的是String.format方法。
这种测试结果也符合我们的基本认知,当出现字符串处理并且需要高性能代码时候优先使用StringBuilder因为他不会一直创建对象;如果需要线程安全使用StringBuffer,因为多线程安全会消耗一部分性能。其次是+方法,一般优化器使用JTI优化,在编译后的代码也会变成StringBuilder。性能最差的是Stringformat和MessageFormat因为他们使用占位符,回去查找字符串占位符然后把数据进行切割,然后在拼接到一起。所以性能会差好多。
但是这种方法也不是没有有点,在String.format方法和MessageFormat可以通过多个占位符链接多个字符串,这种在业务逻辑处理上会简单好多。所以在性能要求不高的地方是可以放心大胆使用(除非对性能要求很高系统做代码优化,大多数系统的不会因为这个作为性能的瓶颈)。
总结一句话,编写代码的时候不是优先考虑性能,而是考虑代码的可读性和业务正确性。性能优化有很多方式,提高缓存使用,减少网络开销,删除不必要的事务,优化数据库查询,任何一种优化都比优化字符串拼接来的快。除非真正的需要的优化在考虑写比较晦涩难懂的代码,过早的优化是万恶之源。
JMH具体使用介绍 @BenchmarkMode 注解 Mode 表示 JMH 进行 Benchmark 时所使用的模式。通常是测量的维度不同,或是测量的方式不同。目前 JMH 共有四种模式:
Throughput: 吞吐量,一段时间内可执行的次数,每秒可执行次数
AverageTime: 每次调用的平均耗时时间。
SampleTime: 随机进行采样执行的时间,最后输出取样结果的分布
SingleShotTime: 在每次执行中计算耗时,以上模式都是默认一次 iteration 是 1s,只有 SingleShotTime 是只运行一次。
All - 所有模式
这些模式也可以混合使用。也可以
1 2 3 4 @BenchmarkMode({Mode.AverageTime,Mode.Throughput}) @BenchmarkMode({Mode.All})
@Warmup注解 进行基准测试前需要进行预热。一般我们前几次进行程序测试的时候都会比较慢, 所以要让程序进行几轮预热,保证测试的准确性。其中的参数 iterations 也就非常好理解了,就是预热轮数。参数time就是每轮预热几次
1 2 @Warmup(iterations = 5, time = 3)
@Measurement 度量,测试的基本参数,可以根据具体情况调整。一般比较重的东西可以进行大量的测试,放到服务器上运行。
参数iterations表示测试论,参数time是每轮测试的次数,参数timeUnit是测试的时间单位,默认是秒
1 2 @Measurement(iterations = , time = 5,timeUnit = TimeUnit.SECONDS )
@Threads 每个进程中的测试线程,这个非常好理解,根据具体情况选择,一般为 cpu 乘以 2。
@Fork 进行 fork 的次数。如果 fork 数是 2 的话,则 JMH 会 fork 出两个进程来进行测试。这种相当于把测试环境做隔离相互不受影响
@OutputTimeUnit 这个比较简单了,基准测试结果的时间类型。一般选择秒、毫秒、微秒、纳秒。
1 2 @OutputTimeUnit(TimeUnit.NANOSECONDS)
@Benchmark 方法级注解,表示该方法是需要进行 benchmark 的对象,用法和 JUnit 的 @Test 类似。
1 2 3 4 5 6 @Benchmark public void testStringAdd (Blackhole blackhole) String a = "" ; a += i; blackhole.consume(a); }
@Param 属性级注解,@Param 可以用来指定某项参数的多种情况。特别适合用来测试一个函数在不同的参数输入的情况下的性能。
1 2 3 @Param(value = {"10", "50", "100"}) private int length;
@TearDown 方法级注解,这个注解的作用就是我们需要在测试之后进行一些结束工作,比如关闭线程池,数据库连接等的,主要用于资源的回收等。
1 2 3 4 @TearDown public void close () }
@Setup 方法级注解,这个注解的作用就是我们需要在测试之前进行一些准备工作,比如对一些数据的初始化之类的。
1 2 3 4 5 //初始化x变量,线程独享 @State(Scope.Thread) public static class ThreadState { volatile double x = Math.PI; }
@State 当使用@Setup参数的时候,必须在类上加这个参数,不然会提示无法运行。
State 用于声明某个类是一个”状态”,然后接受一个 Scope 参数用来表示该状态的共享范围。 因为很多 benchmark 会需要一些表示状态的类,JMH 允许你把这些类以依赖注入的方式注入到 benchmark 函数里。Scope 主要分为三种。
Thread: 该状态为每个线程独享。
Group: 该状态为同一个组里面所有线程共享。
Benchmark: 该状态在所有线程间共享。
JMH 陷阱 死码消除 死码消除:编译器原理中,死码消除(Dead code elimination)是一种编译优化技术,它的用途是移除对程序执行结果没有任何影响的代码。移除这类的代码有两种优点,不但可以减少程序的大小,还可以避免程序在执行中进行不相关的运算行为,减少它执行的时间。不会被执行到的代码(unreachable code)以及只会影响到无关程序执行结果的变量(Dead Variables),都是死码(Dead code)的范畴。
死码消除这个概念很多人其实并不陌生,注释的代码,不可达的代码块,可达但不被使用的代码等等。由于 JIT 擅长删除“无效”的代码,当你意识到 DCE 现象后,应当有意识的去消费掉这些孤立的代码,例如 return。JMH 不会自动实施对冗余代码的消除。
JMH使用Blackhole的consume方法来优化。或者把下面方法的a返回也可以
1 2 3 4 5 6 7 8 @Benchmark public void testStringAdd (Blackhole blackhole) String a = "" ; for (int i = 0 ; i < length; i++) { a += i; } blackhole.consume(a); }
常量折叠与常量传播 常量折叠 :在编译时期简化常数的一个过程,常数在表示式中仅仅代表一个简单的数值,就像是整数 2,若是一个变数从未被修改也可作为常数,或者直接将一个变数被明确地被标注为常数。
有些编译器,常数折叠会在初期就处理完,例如 Java 中的 final 关键字修饰的变量就会被特殊处理。而将常数折叠放在较后期的阶段的编译器,也相当常见
1 2 3 4 5 6 7 8 9 10 11 12 13 14 15 16 17 18 19 20 21 22 23 24 25 26 private double x = Math.PI;private final double wrongX = Math.PI;@Benchmark public double baseline () return Math.PI; } @Benchmark public double measureRight () return Math.log(x); } @Benchmark public double measureWrong_1 () return Math.log(Math.PI); } @Benchmark public double measureWrong_2 () return Math.log(wrongX); }
只有最后的 measureRight 正确测试出了 Math.log 的性能,measureWrong_1,measureWrong_2 都受到了常量折叠的影响。
常数传播 : 替代表示式中已知常数的过程,也是在编译时期进行,包含前述所定义,内建函数也适用于常数。
1 2 3 4 5 public int calumet () int x = 14 ; int y = 7 - x / 2 ; return y * (28 / x + 2 ); }
编译优化后
1 2 3 4 5 public int calumet () int x = 14 ; int y = 0 ; return 0 ; }
使用正确的循环方法 JIT & OSR 对循环的优化,直接使用for循环会有问题。比如下面这个例子就是循环越多,结果越快。
OSR:On-Stack Replacement ,OSR是一种在运行时替换正在运行的函数/方法的栈帧的技术。
1 2 3 4 5 6 7 8 9 10 11 12 13 14 15 16 17 18 19 20 21 22 23 24 25 26 27 28 29 30 31 32 33 34 35 36 37 38 39 40 41 42 43 44 45 46 47 48 49 50 51 52 53 54 55 56 57 58 59 60 61 62 63 64 65 66 67 68 69 70 71 @BenchmarkMode(Mode.AverageTime) @Warmup(iterations = 3) @Measurement(iterations = 5, time = 2) @Threads(4) @Fork(1) @OutputTimeUnit(TimeUnit.NANOSECONDS) @State(Scope.Thread) public class XYTest private int x=1 ; private int y=2 ; @Benchmark public int measureRight () return (x + y); } private int reps (int reps) int s = 0 ; for (int i = 0 ; i < reps; i++) { s += (x + y); } return s; } @Benchmark @OperationsPerInvocation(1) public int measureWrong_1 () return reps(1 ); } @Benchmark @OperationsPerInvocation(10) public int measureWrong_10 () return reps(10 ); } @Benchmark @OperationsPerInvocation(100) public int measureWrong_100 () return reps(100 ); } @Benchmark @OperationsPerInvocation(1000) public int measureWrong_1000 () return reps(1000 ); } @Benchmark @OperationsPerInvocation(10000) public int measureWrong_10000 () return reps(10000 ); } @Benchmark @OperationsPerInvocation(100000) public int measureWrong_100000 () return reps(100000 ); } public static void main (String[] args) throws RunnerException Options options = new OptionsBuilder() .include(XYTest.class.getSimpleName()) .result("result.json" ) .resultFormat(ResultFormatType.JSON).build(); new Runner(options).run(); } }
JMH测试结果
1 2 3 4 5 6 7 8 Benchmark Mode Cnt Score Error Units XYTest.measureRight avgt 5 1.021 ± 0.044 ns/op XYTest.measureWrong_1 avgt 5 1.019 ± 0.066 ns/op XYTest.measureWrong_10 avgt 5 0.131 ± 0.012 ns/op XYTest.measureWrong_100 avgt 5 0.061 ± 0.011 ns/op XYTest.measureWrong_1000 avgt 5 0.037 ± 0.005 ns/op XYTest.measureWrong_10000 avgt 5 0.053 ± 0.008 ns/op XYTest.measureWrong_100000 avgt 5 0.041 ± 0.005 ns/op
因为有OSR的存在所以不是循环次数越多平均时间就越短
正确的使用JMH的循环
1 2 3 4 5 6 7 8 9 10 11 12 @Param(value = {"10", "50", "100"}) private int length;@Benchmark public void testStringAdd (Blackhole blackhole) String a = "" ; for (int i = 0 ; i < length; i++) {a += i; } blackhole.consume(a); }
方法内联 内联函数 :在计算机科学中,内联函数 (有时称作在线函数 或编译时期展开函数 )是一种编程语言结构,用来建议编译器对一些特殊函数进行内联扩展(有时称作在线扩展 );也就是说建议编译器将指定的函数体插入并取代每一处调用该函数的地方(上下文),从而节省了每次调用函数带来的额外时间开支。
内联扩展 :内联扩展是一种特别的用于消除调用函数时所造成的固有时间消耗方法。一般用于能够快速执行的函数,因为在这种情况下函数调用的时间消耗显得更为突出。
内联前的函数:
1 2 3 4 5 6 public int fun1 (int a, int b) return fun2(a, b); } public int fun2 (int a, int b) return a + b; }
内联后的函数:
1 2 3 public int fun1 (int a, int b) return a + b; }
Java 方法内联 和 C++ 函数内联区别
C++ 函数内联可通过inline进行声明,而Java 方法内联则由JVM控制,开发者无法控制
C++ 函数内联为编译时进行,而Java 方法内联则是由JIT在运行期进行
Java的JIT优化里面,会把经常调用的热点代码编译放到一起,不用去让方法频繁的被调用,减少指令执行周期,以提高执行效率。所以在进行基准测试时候要关注JIT是不是进行方法内联。 JIT 优化通常这个值由 -XX:CompileThreshold 参数进行设置,使用 client 编译器时,默认为 1500;使用 server 编译器时,默认为 10000;
方法内联也可能对 Benchmark 产生影响;或者说有时候我们为了优化代码,而故意触发内联,也可以通过 JMH 来和非内联方法进行性能对比。
1 2 3 4 5 6 7 8 9 10 11 12 13 public void target_blank () } @CompilerControl(CompilerControl.Mode.DONT_INLINE) public void target_dontInline () } @CompilerControl(CompilerControl.Mode.INLINE) public void target_inline () }
分支预测 分支预测:解决处理分支指令(if-then-else)导致流水线失败的数据处理方法,由CPU来判断程序分支的进行方向,能够加快运算速度。
当包含流水线技术的处理器处理分支指令时就会遇到一个问题,根据判定条件的真/假的不同,有可能会产生跳转,而这会打断流水线中指令的处理,因为处理器无法确定该指令的下一条指令,直到分支执行完毕。流水线越长,处理器等待的时间便越长,因为它必须等待分支指令处理完毕,才能确定下一条进入流水线的指令。
举个栗子(来自stackoverflow)
假设我们是在 19 世纪,而你负责为火车选择一个方向,那时连电话和手机还没有普及,当火车开来时,你不知道火车往哪个方向开。于是你的做法(算法)是:叫停火车,此时火车停下来,你去问司机,然后你确定了火车往哪个方向开,并把铁轨扳到了对应的轨道。
还有一个需要注意的地方是,火车的惯性是非常大的,所以司机必须在很远的地方就开始减速。当你把铁轨扳正确方向后,火车从启动到加速又要经过很长的时间。
那么是否有更好的方式可以减少火车的等待时间呢?
有一个非常简单的方式,你提前把轨道扳到某一个方向。那么到底要扳到哪个方向呢,你使用的手段是——“瞎蒙”:
如果蒙对了,火车直接通过,耗时为 0。
如果蒙错了,火车停止,然后倒回去,你将铁轨扳至反方向,火车重新启动,加速,行驶。
如果你很幸运,每次都蒙对了,火车将从不停车,一直前行!如果不幸你蒙错了,那么将浪费很长的时间。
虽然不严谨,但你可以用同样的道理去揣测 CPU 的分支预测,有序数组使得这样的预测大部分情况下是正确的,所以带有判断条件时,有序数组的遍历要比无序数组要快。
这同时也启发我们:在大规模循环逻辑中要尽量避免大量判断(是不是可以抽取到循环外呢?)。
1 2 3 4 5 6 7 8 9 10 11 12 13 14 15 16 17 18 19 20 21 22 23 24 25 26 27 28 29 30 31 32 33 34 35 36 37 38 39 40 41 42 43 44 45 46 47 48 49 50 51 52 53 54 55 56 @BenchmarkMode(Mode.AverageTime) @Warmup(iterations = 3) @Measurement(iterations = 5, time = 2) @Threads(4) @Fork(1) @OutputTimeUnit(TimeUnit.NANOSECONDS) @State(Scope.Thread) public class ArrayTest private static final int COUNT = 1024 * 1024 ; private byte [] sorted; private byte [] unsorted; @Setup public void setup () sorted = new byte [COUNT]; unsorted = new byte [COUNT]; Random random = new Random(1234 ); random.nextBytes(sorted); random.nextBytes(unsorted); Arrays.sort(sorted); } @Benchmark @OperationsPerInvocation(COUNT) public void sorted (Blackhole bh1, Blackhole bh2) for (byte v : sorted) { if (v > 0 ) { bh1.consume(v); } else { bh2.consume(v); } } } @Benchmark @OperationsPerInvocation(COUNT) public void unsorted (Blackhole bh1, Blackhole bh2) for (byte v : unsorted) { if (v > 0 ) { bh1.consume(v); } else { bh2.consume(v); } } } public static void main (String[] args) throws RunnerException Options options = new OptionsBuilder() .include(ArrayTest.class.getSimpleName()) .result("result.json" ) .resultFormat(ResultFormatType.JSON).build(); new Runner(options).run(); } }
结果
1 2 3 Benchmark Mode Cnt Score Error Units ArrayTest.sorted avgt 5 0.548 ± 0.027 ns/op ArrayTest.unsorted avgt 5 4.379 ± 0.107 ns/op
排序的数组平均时间要比不排序的数组快一个数量级。排序数组的时间只是不排序数组的零头。
总结 关于demo的总结我写在上面,下面是对这个工具的想法,看了下大佬的文章时间基本是都是从2018年开始有关于JMH相关资料。我偶尔一次用到也是看到别人文章中可以使用JMH来测试一段热点代码的性能。不过通过JMH就可以分析出代码的执行效率。特别是某个人和你杠那种方式更快,那没通过这个测试就可以知道结果。
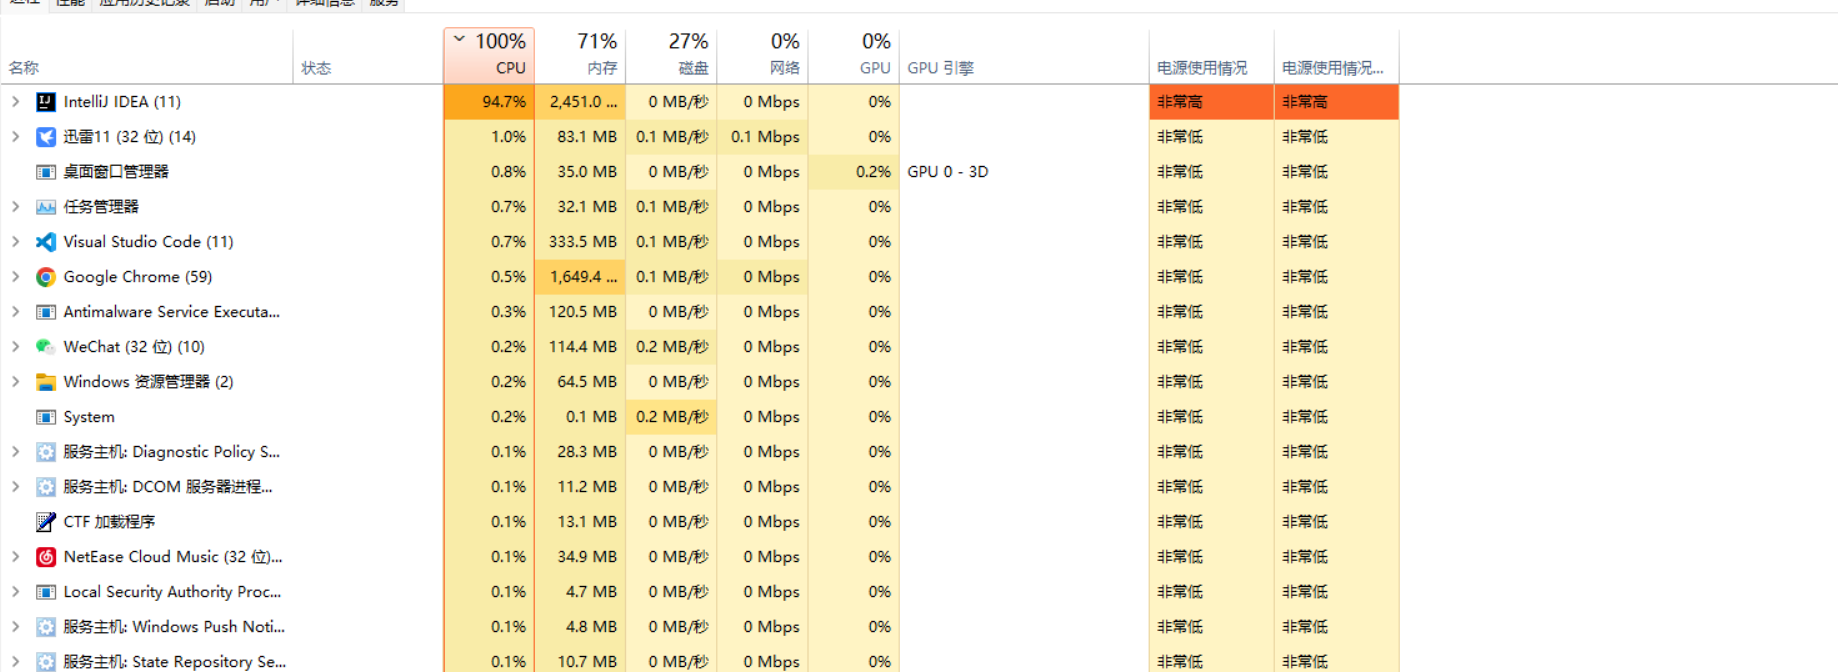
最后这个JMH测试会非常吃CPU,这个时候电脑如果不好会卡死。对笔记本这种电量消耗也是蛮大的。
参考 Java微基准测试框架JMH
如何在Java中做基准测试
JAVA 拾遗 — JMH 与 8 个测试陷阱
JMH-samples
Why is processing a sorted array faster than processing an unsorted array


